
Conway’s Game of Life
John Conway’s Game of Life is a cellular automation, zero-player game devised by the british mathematician John Horton Conway. This means that the “player” decides the initial state of the board and once the game begins the board evolves based on it’s own set of rules.
The board in the Game of Life is constructed of a rectangular grid of square cells, where each cell can be treated as alive or dead. Every cell has information about the current state of it’s 8 neighboring cells at the current time step, which dictates what the cells state will be in the next time step based on the following rules:
- Any live cell with two or three live neighbours survives.
- Any dead cell with three live neighbours becomes a live cell.
- All other live cells die in the next generation. Similarly, all other dead cells stay dead.
https://en.wikipedia.org/wiki/Conway%27s_Game_of_Life
The Following is my application of this Game of Life and the steps i took to build it.
The Start
The Process can be broken down into 3 parts
- build an interactive grid
- apply the updating logic to play the Game of Life
- add buttons to provide the user some interactivity
As a starting point I used this pygame template for setting up a simple game template.
The template is fairly self explanitory but here’s a quick explanation of it’s logic:
First they import pygame and define some global variables that represent the RGB values of colors they want to use.
import pygame

# Define some colors
BLACK = (0, 0, 0)
WHITE = (255, 255, 255)
GREEN = (0, 255, 0)
RED = (255, 0, 0)
Then in the call function they initialize pygame, setup the dimensions of the pygame display they want to use, create the display object named screen and give the screen a name. They also set any initial flags the pygame will use: for example the done flag controls the exit behaviour of our main loop. They also start a clock in order to control the framerate/update speed of the main loop.
if __name__ == '__main__':

    pygame.init()

    # Set the width and height of the screen [width, height]
    size = (700, 500)
    screen = pygame.display.set_mode(size)

    pygame.display.set_caption("My Game")

    # Loop until the user clicks the close button.
    done = False

    # Used to manage how fast the screen updates
    clock = pygame.time.Clock()
Then they start the main event loop. Everytime the event loop loops it checks for if the quit event was triggered, if it was then it sets the done flag and our main loop will end and pygame will run it’s quit command. In other cases we would then have code for updating our games variables, and code for redrawing the screen to match the games new state.
clock.tick(60) controls the maximum framerate of our loop causing a delay in execution until 1/60th of a second has passed.
pygame.display.flip() fully updates the screen, pygame.display.update() will also do this but update has the ability to update specified objects instead of the entire screen causing it to be faster in other applications.
 while not done:
        # --- Main event loop
        for event in pygame.event.get():
            if event.type == pygame.QUIT:
                done = True

        # --- Game logic should go here

        # --- Screen-clearing code goes here

        # Here, we clear the screen to white. Don't put other drawing commands
        # above this, or they will be erased with this command.

        # If you want a background image, replace this clear with blit'ing the
        # background image.
        screen.fill(WHITE)

        # --- Drawing code should go here

        # --- Go ahead and update the screen with what we've drawn.
        pygame.display.flip()

        # --- Limit to 60 frames per second
        clock.tick(60)

    # Close the window and quit.
    pygame.quit()
Building the Grid
Modifying the template our first goal is to create an interactive grid.
Drawing the grid
First we want to initialize a 2 dimensional array that will represent the cells in our grid. Since cells can only be in 1 of 2 states (alive or dead) it makes sense to use binary values 1 and 0 to represent if a cell is alive or dead. Using np.zeros we create an nxm 2d array of zeros.
def init_grid(dimx, dimy):
    cells = np.zeros((dimy, dimx))
    return cells
These constants define how our grid will look.
width = 20
height = 20
margin = 5
using the below code and our constants we iterate through our grid drawing each cell in a position dictated by its position in the grid. our grid is a 2d array with 0 indexing so to transform our 0-n index’ to regions of pixels on our game surface we multiply the corresponding row/col index’ by our midth/height and add 1 margin to account for the edge of our grid.
# --- Screen-clearing code goes here
# If you want a background image, replace this clear with blit'ing the
# background image.
screen.fill(BLACK)

# --- Drawing code should go here

for r, c in np.ndindex(grid.shape):
    if not grid[r, c]:
        pygame.draw.rect(screen, WHITE,
                            (c * (width + margin) + margin, r * (height + margin) + margin, width, height))
    else:
        pygame.draw.rect(screen, GREEN,
                            (c * (width + margin) + margin, r * (height + margin) + margin, width, height))
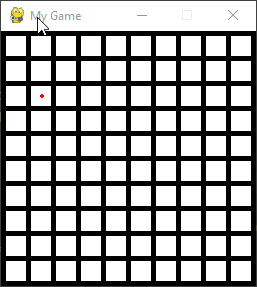
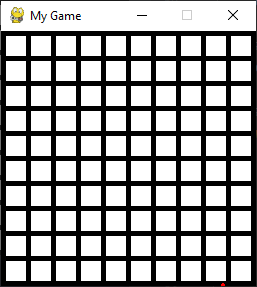
At this point you should be able to generate a grid like this
interacting with the gid
Now that we have a grid we want our user to be able to interact with it to change the starting positions.
to start off we want to add a flag to tell us what state the mouse is in as well as a 2nd grid to track how many times we intentionally clicked a square.
size = (10*width+11*margin, 10*height+11*margin)
screen = pygame.display.set_mode(size)

pygame.display.set_caption("My Game")

grid = init_grid(10, 10)
swap_status = init_grid(10, 10)  # 2nd grid to map whether a square has been swapped this click
mouse_down = False
with that done we’re now free to add the MOUSEBUTTONDOWN and MOUSEBUTTONUP events to our list of watched events.
# -------- Main Program Loop -----------
while not done:
    # --- Main event loop
    for event in pygame.event.get():
        if event.type == pygame.QUIT:
            done = True
        elif event.type == pygame.MOUSEBUTTONDOWN:
            mouse_down = True
        elif event.type == pygame.MOUSEBUTTONUP:
            mouse_down = False
            swap_status = init_grid(10, 10)
Now that we are tracking the state of the mouse we can convert the mouse coordinates back into row and column index’s. By keeping track of swap_status and reseting the swap status whenever the mouse button is let go we prevent the state of our cells from changing more than once between clicks.
    # --- Game logic should go here
    if mouse_down:
        player_position = pygame.mouse.get_pos()
        if 0 < player_position[0] < size[0] and 0 < player_position[1] < size[1]:
            row = (player_position[1] - margin) // (height + margin)
            col = (player_position[0] - margin) // (width + margin)
            if not swap_status[row, col]:
                swap_status[row, col] = 1
                grid = update_cell(row, col, grid)
When the mouse button is clicked down our code will now detect and track what region the mouse interacts with and depending on the region will update the cells accordingly in our grid.
Updating the Grid
Now it’s time to add the updating logic. This function here takes in the grid of cells and iterates through it updating each cells status by the rules of the game of life and then draws the corresponding cell on the grid.
The cells must be drawn as we update our entire grid because we don’t want to iterate through our grid more than a single time during execution.
def update_life(surface, cur):
    nxt = np.zeros((cur.shape[0], cur.shape[1]))

    for r, c in np.ndindex(cur.shape):
        num_alive = np.sum(cur[r - 1:r + 2, c - 1:c + 2]) - cur[r, c]

        if cur[r, c] == 1 and num_alive < 2 or num_alive > 3:
            col = col_almost_dead
        elif (cur[r, c] == 1 and 2 <= num_alive <= 3) or (cur[r, c] == 0 and num_alive == 3):
            nxt[r, c] = 1
            col = col_alive

        col = col if cur[r, c] == 1 else col_background
        pygame.draw.rect(surface, col,
                         (c * (WIDTH + MARGIN) + MARGIN, r * (WIDTH + MARGIN) + MARGIN, WIDTH, HEIGHT))
    return nxt
We simply set a flag and depending on the status of that flag we either use our update_life function to draw the grid or we draw using the same code as our interactive grid.
 # --- Drawing code should go here
        if start:
            grid = update_life(screen, grid)
        else:
            draw_grid(grid)
        # draw the buttons and assign text.
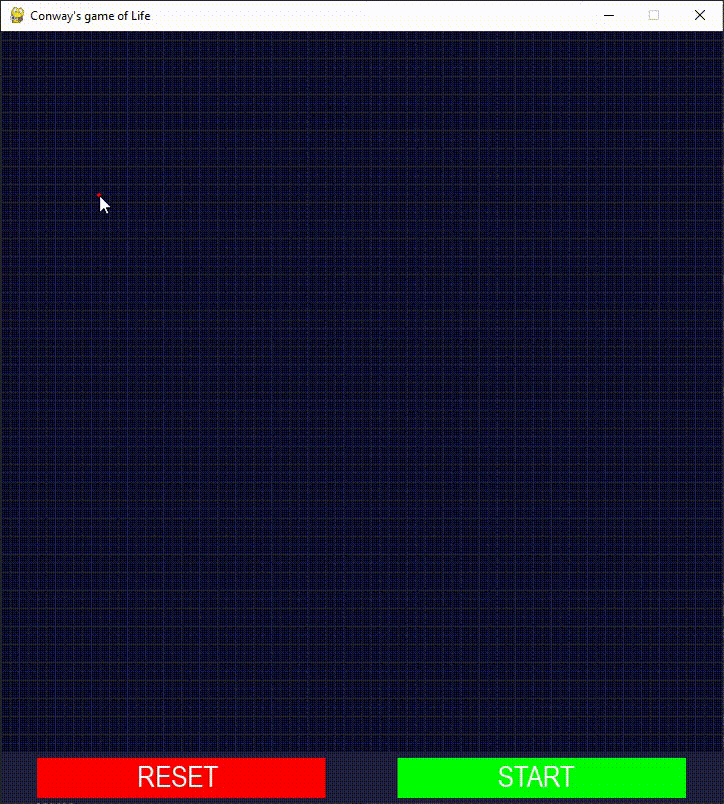
Adding Buttons
Finally we need some buttons so the user can decided when they have finished setup
First we need to initialize the font and text for our buttons. Then initialized the reset and start buttons as rectangle objects at their corresponding locations.
    # rendering text for buttons
    smallfont = pygame.font.SysFont('sans', 30)
    START = smallfont.render('START', True, WHITE)
    RESET = smallfont.render('RESET', True, WHITE)
    # rendering necessary rectangles
    btn_bg = pygame.Rect(0, MARGIN + Y_DIM * (HEIGHT + MARGIN), size[0], BTN_HEIGHT)
    reset_btn = pygame.Rect(0, MARGIN + Y_DIM * (HEIGHT + MARGIN), size[0] / 2, BTN_HEIGHT)
    start_btn = pygame.Rect(size[0] / 2, MARGIN + Y_DIM * (HEIGHT + MARGIN), size[0] / 2, BTN_HEIGHT)
    reset_btn.scale_by_ip(x=0.8, y=0.8)
    start_btn.scale_by_ip(x=0.8, y=0.8)
For the buttons i decided to use pygames built in rectangle objects and their inbuilt collidepoint method. The collidepoint performs a check on whether the supplied coordinates are inside our rectangle so we check where the mouse is when it clicks down. If we click the start button we switch the start flag and begin updating life, if we click reset then we clear our grid and return to the initial state.
            elif event.type == pygame.MOUSEBUTTONDOWN:
                mouse_down = True
                player_position = pygame.mouse.get_pos()
                if reset_btn.collidepoint(player_position):
                    grid = init_grid(X_DIM, Y_DIM)
                    start = False
                if start_btn.collidepoint(player_position):
                    start = True
The complete code
Complete code can be found here: https://github.com/amunwes/Game-of-life
Where to go from here
some potential improvements:
Use a single grid to track cell status, and swap status. could also store pygame.rect() objects in our grid instead of using math to track interactions.